How to set up a Multisite in WordPress
What is Multisite?
If you administer one or more WordPress sites, you should take a look at the Multi-site feature. It is a feature of WordPress 3.0 and above. It allows a single WordPress install to host many sites. Besides, it allows you to configure them within a single dashboard.
An example is a teacher using this feature to give each student their blog. But, administer all from one single place. Or, a developer who builds WordPress sites and have to manage them on a daily basis. This is where multi-site feature comes in. If you do not use this in cases such as these, you need to the have a separate WordPress install for each site. Besides, you would need to administer each one of them via different admin dashboard.
How is Multisite Different from a normal WordPress install?
A Multisite installation is very similar to a standard install. The folder structure, core files, and code base are the same. But, two things are different. The wp-config.phpfile has some extra lines that show that Multi-site is enabled and how it get configured.
Also, the WP-uploads folder contains a sub-folder for each site in the network. Files uploaded to a site get stored in its sub-folder. Multi-site also adds extra tables to the database, because each site gets its own set of tables.

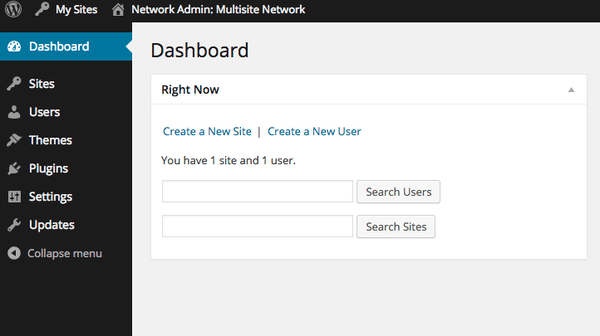
Also, the admin screens are pretty like a standard WordPress site. Additionally, this should be familiar to anyone who has worked with WordPress. There are only a few differences here and there for the Super Admin.
Only the Super Admin can install plugins and create new sites from this dashboard. Also, the Super Admin can assign a Site Admin for each new site location. Here, he/she can choose to activate plugins that are available to the whole network. However, site admin cannot install new ones. The same goes for themes. The admin screens for installing themes and plugins are not visible to Site Admins.
Pros & Cons of Using WordPress Multi-site
Who Should consider & avoid using WordPress Multi-site feature?
How to setup a Multi site network?
Step 1: What to do before you set up WordPress multisite
The first and important step is to get a high quality and a reliable host. Although you can run smaller networks on shared hosting, it is advisable to use your own server, VPS or good hosting plan from a reliable source. Also, you should know the process of installing a normal WordPress website, as well as working with an FTP client.
Furthermore, you should know working with an FTP client. After choosing your hosting server, get your network domain structure. It is either sub-directories or sub-domains.There is a difference between sub-domain and sub-directories. Sub-directories need the enabling of permalink. However, the sub-domains need configuration of wildcard sub-domains. A sub-domain URL is like https://site-1.yournetwork.com. Whereas a sub-directories domain will be like http://yournetwork.com/site-1
Step 2: Activation of Multisite network
Are you done installing your WordPress? Now select the FTP client you are using,and open the WP-config.php file. Within the file go to the line reading
/* That's all, stop editing! Happy blogging. */
Above this line, create a new line that reads as follows and save the file on your server.
define( 'WP_ALLOW_MULTISITE', true );
Step 3: Network Configuration
After activating your multi-site feature, you need to configure your network. Hence, you will avoid hiccups when you start adding other sites. To do so, start by deactivating all the plugins available on your website. However, you can skip the process, but you might experience some problems in other steps.
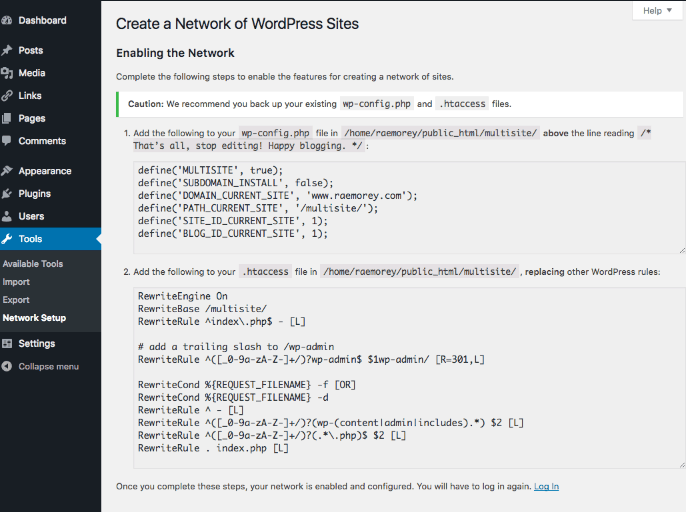
After the deactivation of plugins, move to tools. Now go to Network setup (Tools >Network Setup) for configuration. This is where you will choose if you will be using sub-directories or sub-domains on your network. During the process, you will receive some explanation at some point on your screen. Nonetheless, you will have to edit your network title, and add the email address of your network administrator. Hence, your files (wp--confg.php and .htaccess) will need some extra rules which have to get copied on them. Ensure you have a backup in hand. You may have to change settings in code editor if your .htaccess file gets hidden and not visible to you.

Step 4: Network Settings
You now need to perform some settings on your network admin dashboard. The network dashboard is vital. This is because you will be using it to install themes and plugins on your network.

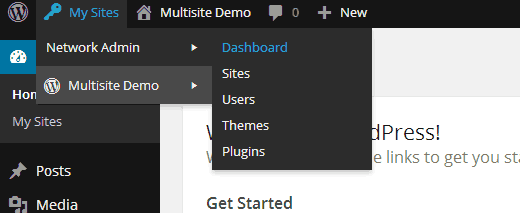
To access the network admin dashboard and other options, go to My Sites > Network Admin. Also, the network admin dashboard has several other modules. You can use the modules in network management. Besides, it is where you add users to your sites, as well as making other sites. For all network settings like email and title, click the settings tab on your dashboard. To add sites > Add New and enter your details as required.

Step 5: Configuration of Uploading Settings
It is important to regularly check how your servers are functioning. Reason being, large networks might compromise your servers.
To avoid such complications, you need to configure the uploading space of each site.
To perform the configuration, move to your multi-site dashboard uploading setting section. Hence, set the space each site will be using for its uploads.

Step 6: Management of Menus
Enter your text here. Site admins on your network can access all plugins available on your network. Thus, it is advisable you manage the menus, to avoid the misuse of some plugins.
To manage the menus, move to menu settings on the dashboard and activate what you want. For example, you can let the site admins use the plugins on their sites by activating the buttons. As a result, site admins on your network cannot remove the plugins they do not want on their sites.


