A broader section of WordPress does not feature many secrets. Indeed, whatever you receive through this CMS (Content Management System) is basically what you see.
We shall focus on the WordPress multisite feature in this article. You will find answers to questions such as what WordPress multisite is and How can you make a multisite network in WordPress.
The WP multisite feature lets WordPress users manage many WordPress websites using a single WordPress installation. But, you cannot implement this feature on your site by either activating it on the WordPress default settings or by installing a theme or plugin.
If you want to apply the WordPress multi-site, you must launch it because it is a real feature created in the WordPress CMS. The most important thing to note is that the feature is there for use, but the dashboard does not have a readily available on/off switch.
Apart from adding a complex layer on your WordPress setup, multisite needs your attention in regards to performance and security to ensure it’s secure and swift for your visitors. For clarity, let us start with:
What is WordPress Multisite?
Basically, it is a feature that lets WordPress users make a network of blogs on their WordPress website. Also, WordPress integrated this feature in their CMS in June 2010, and later upgraded to version 3.0.
WordPress multisite copied the concept of making a network of blogs from MU, but they developed it to let users build a network of sites using one WordPress installation. Therefore, if you were looking for a way to manage all your WordPress websites, the solution is WordPress multisite.
The most interesting thing regarding the use of WordPress multisite is that this feature becomes an inherent section of the WordPress interface after activation. Also, its learning curve is minimal as it works like other WordPress.
However, there are some encounter differences between normal WordPress Management and WordPress multisite because:
- Your network is placed in a single WordPress installation, making it easier to update plugins, themes, and core.
- Activating this feature requires you to be okay with updating files such as .htaccess and wp-config.php.
- WordPress multisite allows just one super admin. The super admin who regulates which websites get added to the network and the themes and plugins that will get activated and are available for utilization. Therefore, site admins can only use the tools they permitted to access without modifying anything.
Generally, there is no much interruption from Multisite in regards to its installation on your WordPress. In fact, the interface resembles each other, and the functionality functions as usual. However, you will see some variations in your database files because you will be using a single installation to run a whole network of WordPress websites.
WordPress Management Tools for Multisite
Irrespective of the time-saving benefits, you should keep in mind that WordPress multisite is not fit for everyone. However, this is not the only available multisite supervision solution.
For example, ManageWP is among other WordPress management tools that assist developers in managing many websites at a go, although they exist outside WordPress.
But, there is a good reason as to why only Multisite exists in WordPress. Here are some vital points to note before decide to use WordPress Multisite:
- WordPress Management tools let you manage many WordPress sites from one dashboard that is outside WordPress. Also, in most cases, these tools require a purchase to use, although they have features such as security and performance supervision and management. Besides that, they offer you the adaptability of managing websites from different clients, web servers, and others. Additionally, every site can utilize a modified domain.
- WordPress Multisite lets you manage many websites within WordPress installation. Nonetheless, all these websites must stay in the same network. Thus, all your websites must use same server resources, IP address, and most importantly be downgraded to the sub-directory or sub-domain of the primary network’s site.
WordPress multisite is the best choice if your objective is to build a connected network of sites. Even so, there are some reasons as to why you should not use it.
Who Should Not Use WordPress Multisite?
If you are one of the following mentioned, then you should not use WordPress multisite:
- You own one or a small number of websites to manage.
- Updating WordPress files is a problem for you.
- Affording the amount of bandwidth or the type of web, as well as required storage to host your websites in a single plan is impossible.
- Various clients own all the sites that you are creating and managing.
- One client owns all the sites you are creating and managing, but they are unrelated and totally different brands.
- Your client requires every website to have its personal IP address and web hosting account.
- Compromising the uptime is impossible in case the primary network goes down.
- You are uncomfortable, unqualified, or unable to manage a whole network of websites.
- The websites admins require complete management over their websites, as well as unlimited modification abilities.
- You used some specific WordPress plugins in your websites, but they are incompatible with multisite.
- Every site needs a different WordPress theme or a completely different set of plugins. Among the benefits of utilizing Multisite is keeping your server light in regards to installing the software. If replication of resources in all sites is not possible, then there is no need of sharing server space.
Who Should Use WordPress Multisite?
If you are one of the following mentioned, then you should use WordPress multisite:
- You would like a single sign-in to access and manage all your websites within one dashboard.
- Outsourcing daily management of your network’s sites to different admins, so as you can focus on one thing is your main objective.
- You have related network of WordPress websites that you can easily manage from a single server and WordPress installation.
- You are a web designer or developer who wants to showcase examples of your web-connected work using screenshots, although in a completely functional website that is a sub-domain of your primary website.
- Making various branches of a website, and let them utilize their private themes, management team, and subdomain among others is your plan.
- You monetize or grow a website by allowing others to build their websites on your network.
- Cutting down on the costs of purchasing many web hosting plans if the sites can be stored together is your plan.
- Your network’s websites share many similar plugins and themes. Thus, the entire network requires a single plugin or theme.
- Streamlining the process of updating all your WordPress websites is all you want, because themes, plugins, and the core need updating for the network and not every website.
Examples of WordPress Multisite
Below are some examples of how Multisite appears while functioning. These examples give a clear picture of business that can benefit from Multisite:
WordPress.com
WordPress.com is the most popular example of a WordPress Multisite network, as it gives users the ability to make their private websites on all WordPress network.
After that, users can create and manage their WordPress subdomain on this network, although regulations apply. For example, the capacity to add themes which are outside WordPress selection have been provided to them.
Edublogs
The other example of WordPress network is Edublogs which allows people to build and host their site content on their website free of charge. However, the websites must be education sites.
Thomson Reuters
Reuters comprises of a whole network of websites which concentrates on its sectors, as well as products.
NBC
Multisite can be used by big TV networks to maintain the subdomains of every TV show in a roster that is on their website. A good example is NBC. If you can click on any of the Shows links, you will be provided with choices for subdomains.
As shown above, the sub-pages resemble the normal NBC website. However, you will see their differences as you click on each link.
New York Times
The other example is the New York Times, a news website that utilizes subdomains to maintain all its personal blogs in one network. Although these blogs have a special identity that allows them to be separated into subsections of the entire website, they belong to one brand.
How Can You Build A WordPress Multisite?
After determining that Multisite is indeed your right tool to use.
Here is a guide on how you can build Multisite in WordPress:
Step 1:- Start by installing WordPress
Start by installing WordPress if you are creating your Multisite network from scratch. Besides that, your hosting service provider should provide a single click installation process for WordPress. Alternatively, you can download WordPress from WordPress.org.
Also, if you are building your WordPress installation from scratch for this Multisite, you have the option of using either subdirectories or subdomains in your web addresses network.
Here is how a subdomain appears like:
https://websiteA.yournetworkname.com
Here is how a subdirectory appears like:
https://yournetworkname.com/websiteB/
Generally, a subdirectory is easier to use because it makes an entirely new directory on your website. As a result, you do not need to modify your domains or DNS records in your hosting provider account. Even so, you have no option but to utilize subdomains that are within the Multisite if your website is older than 30days.
Step 2: Backing up your website
In case you are already running a WordPress website, ensure you have its back up before going on with the settings. You can do using a WordPress backup and restoration plugin.
Step 3: Disable all active plugins
WordPress recommends you disable all plugins that are actively running on your website, prior to activating your Multisite. You can then go ahead and re-activate your plugins after the Multisite starts working effectively.
Also, ensure you have logged out of your WordPress to proceed with the next step.
Step 4: Update your wp-config.php
The initial step to activate your WordPress Multisite feature is updating the files of your WordPress website.
To do so, start by logging in your web hosting account.You can then update your files using the FTP client or file manager tool.
Locate the root of your website, which is labeled as “public-html,” and then search for the wp- config.php file.
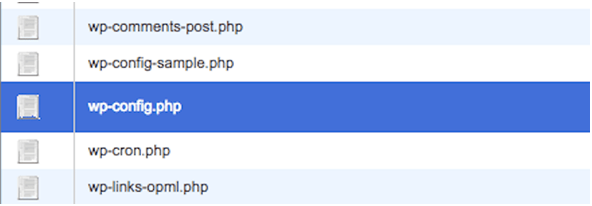
After that, open the files so that you can edit and search for the line that is highlighted below:
define( ‘AUTOSAVE_INTERVAL’, 300 );define( ‘WP_POST_REVISIONS’, 5 );define( ‘EMPTY_TRASH_DAYS’, 7 );define( ‘WP_CRON_LOCK_TIMEOUT;, 120 );/* That’s all, stop editing! Happy blogging. */
/** Absolute path to the WordPress derectory. */if ( !defined( ‘ABSPATH’ ) ) define( ‘ABSPATH;, dirname(__FILE__) . ‘/’);
/** Sets up WordPress vars and included files. */require_once(ABSPATH . ‘wp-settings.php;);
Add this directive immediately above the highlighted line:
/* Multisite */define( ‘WP_ALLOW_MULTISITE’, true );
This is how it appear:
define( ‘AUTOSAVE_INTERVAL’, 300 );define( ‘WP_POST_REVISIONS’, 5 );define( ‘EMPTY_TRASH_DAYS’, 7 );define( ‘WP_CRON_LOCK_TIMEOUT’, 120 );/* Multisite */define( ‘WP_ALLOW_MULTISITE’, true );/* That’s all, stop editing! Happy blogging. */
/** Absolute path to the WordPress directory. */if ( !defined( ‘ABSPATH’ ) ) define( ‘ABSPATH’, dirname(__FILE__) . ‘/’);
Finally, save your changes in the file.
Step 5: Installation of Multisite in Your WordPress
To install Multisite in WordPress, log in your WordPress. After that, go to Tools icon and click the “Network Setup” option. At this point, you just need to build your network’s name and decide who is the super-admin.
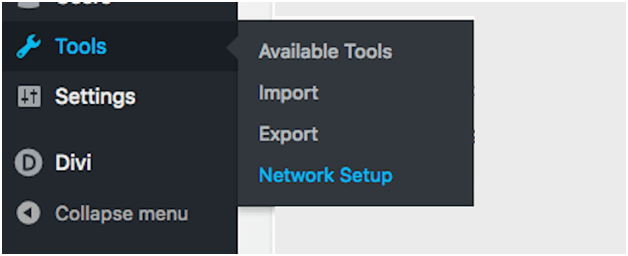
Use the email address of the super-admin here, so as to assign access. It is good to note that you might not get the above sub-domain installation note if your WordPress installation was brand new. The note shows that one cannot use subdirectories since the site existed for long. For a new website, you can use your preferred option.
In case your hosting and control panel needs you to make a wildcard subdomain prior to continue with the settings, you will get a message before you are allowed to go on.
Step 6: Activate The Network
Here you will get a screen with two code snippets:
Go back to the FTP Client or file manager. Ensure you have turned on the choice to show hidden files.
After that, open the wp-config.php again to edit. Now, use WordPress instructions to paste the corresponding snippet.
define( ‘AUTOSAVE_INTERVAL’, 300 );define( ‘WP_POST_REVISIONS’, 5 );define( ‘EMPTY_TRASH_DAYS’, 7 );define( ‘WP_CRON_LOCK_TIMEOUT’, 120 );/* Multisite */define( ‘WP_ALLOW_MULTISITE’, true );define( ‘MULTISITE’, true);define( ‘SUBDOMAIN_INSTALL’, ‘EXAMPLE.COM’ );define( ‘PATH_CURRENT_SITE’, ‘/’);define( ‘SITE_ID_CURRENT_SITE’, 1);define( ‘BLOG_ID_CURRENT_SITE’, 1);/* That’s all, stop editing! Happy blogging. */
/** Absolute path to the WordPress directory. */if ( !defined( ‘ABSPATH’) ) define( ‘ABSPATH’, dirname(__FILE__) . ‘/’);
Save the changes you have made and close the window.
The next step requires you to edit the .htaccess file. However, the .htaccess files are normally hidden in the server. Therefore, you should ensure all hidden files are visible on the file manager. In case you are not able to see the .htaccess although you know it exits, you can confirm through the file manager search, and attach this at the end of the file manager URL: “&show hidden=1&saveoption=1”. This action will display all hidden files.
After finding the .htacess file, find these lines in your file:
# END Wordfence WAF
# BEGIN WordPressAddHandler application/php-edge .php<IfModule mod_rewrite.c>RewriteEngine OnRewriteBase /RewriteRule ^index.php$ – [L]RewriteCond %{REQUEST_FILENAME} !-fRewriteCond %{REQUEST_FILENAME} !-dRewriteRule . /index.php [L]</IfModule>
#END WordPress
You should then replace the RewriteEngin On statement using the WordPress snippet. If the .htaccess file is unavailable, you can build one that features only this snippet, then upload it to your server.
Here is the appearance of the file after doing so:
# END Wordfence WAF
# BEGIN WordPressAddHandler application/php-edge .php<IfModule mod_rewrite.c>RewriteEngine OnRewriteBase /RewriteRule ^index.php$ – [L]# add a trailing slash to /wp-adminRewriteRule ^([_0-9a-zA-Z-]+/)?wp-admin$ $1wp-admin/ [R=301, L]RewriteCond %{REQUEST_FILENAME} !-f [OR]RewriteCond %{REQUEST_FILENAME} !-dRewriteRule ^ – [L]RewirteRule ^([_0-9a-zA-Z-]+/)?(wp-(content|admin|includes).*) $2 [L]RewriteRule ^([_0-9a-zA-Z-]+/)?(.*.php)$ $2 [L]RewriteRule . /index.php [L]</IfModule>
#END WordPress
Now save your file changes, and then log in again in your WordPress.
How to Manage a WordPress Multisite?
In any case, you are the super-admin, you might have noticed that your WordPress appears somehow different after configuring for Multisite:
Here is what you are supposed to do with these new choices:
Settings
Configuring the settings of your network is the first thing you are supposed to do. Because you have already built your Network Admin email and Title, you now need to go down and configure the User,Registration, and Other settings.
- Menu settings: You can activate it to allow website admins to be able to select the plugins they would like to activate on their websites.
- Registration settings: Determine if people will either sign up or not to build their website on your network. Besides this, you can allow the website admins the capacity to allow new users on their websites.
- Language settings: Lets you modify the default language of your network sites.
- Upload settings: This allows you to manage admins and other users, in regards to the type of content files to upload on their websites, as well as the size of the files.
- New website settings: Enables you to modify messages that new admins will get after starting to make their content on your network.
Sites
Irrespective of the interface, you will see a new module named “Sites.” Use this module to build new sites on your primary network.
Setting up the website is easier. You need to make the web address and the title of your blog, and then designate the admin who will be managing the website. Once the admin logs in WordPress using the designated email, the new site will display.
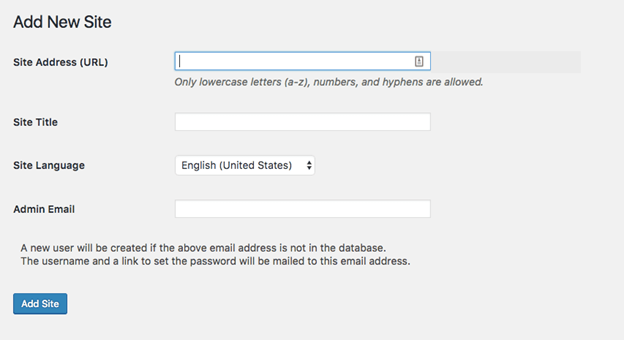
They can go to the top menu bar, and use My Sites option to access if they are uncertain. For further configuring of the website, go to Sites>All Sites>Edit (below the website’s name).
Users
The list of all users will appear here. Besides this, you can utilize this module in adding and deleting from your websites and network, similar to normal WordPress.
Themes
In regards to the designation of WordPress themes in a Multisite network, the choices are there but few.
Therefore, you can go into every particular website and enable personal WordPress theme for availability.
Additionally, you can have a view of the available choices on the themes tab:
Furthermore, it is here where you can activate entire themes for utilization in the network if your plan is ensuring everyone makes their sites using one design.
Plugins
There is a major difference between plugins and themes, because plugins only allow you to enable them for use in the whole network.
However, in case you checked the Menu settings choices, the admins can select if they would like the plugins to be enabled or disabled whenever they want.
Because plugins in your older normal WordPress installation will still be inactive, you can use your backup and activate them if you will utilize them on your Multi-site. Check out WordPress Plugins & Themes maintenance services, if you are facing any issues. Also. you can check the plugins that you must have for your WordPress site.
Updates
The WordPress Multisite resembles the normal older WordPress. Thus, you need to create themes, plugins, and WordPress Core updates to ensure it is secure.
You only need to update the main version in your network dashboard to make updates in your entire network and save the time of updating individual websites.
Nonetheless, the standard updates and Multisite updates have one difference, which is the Multisite has two update steps. The first one is installing the update, and the second is making it happen to all your network’s sites.
Facing any WordPress related issue? You can consult WordPress experts.

